Saturday, January 20, 2018

Instant Pot

Instant Pot


One of the hottest items for the last year or so on the RV boards I read has been the Instant Pot.  What is an Instant Pot?  No sales pitch here, it is an intelligent electric pressure cooker.  You can cook one pot meals, rice, stews, pretty much anything you can cook in a pot.  As a pressure cooker, it can cook things faster, and since it is intelligent (monitors pressure, temperature and time) you can set it and then walk away.  Seems like a winner.

So my In-laws gave me one for Christmas.  I do try and limit what I carry in the Fuse.  Not just because space is at a little premium, but if you were to look at my kitchen at home you would see every gadget known to man in one of the cabinets.  Yet, I still find myself using the same several pots 90% of the time.  So I have been testing the Instant Pot since Christmas.

So what have I been experimenting with.  One thing it says is that it is a rice cooker.  So I decided to try that first.  It will cook rice.   Pretty easy.  Stick 2 cups of rice with 3 cups of water in the stainless steel cooking pot.  Close the lid, make sure the steam vent is closed, hit the rice button and stand back.  It will beep when it gets to pressure and beep again when it is finished cooking.   Once it is finished cooking, wait 10 minutes and then open the steam vent.  In a minute or so you can open the lid (once all of the pressure is released) and you have rice.  Takes about 30 minutes.   Not so bad until I tell you that with my normal pot I can do the same thing in the same amount of time.   The Instant Pot cooks rice fine.  It is just not any improvement over the traditional method.

The next thing I have been experimenting with is Chicken and Rice or as known in some places Chicken Purleu.  A full meal in a pot.  So the recipe is:

  • 3 cups of Water
  • 2 cups of Jasime Rice
  • 1 tablespoon of dried onion flakes
  • 2 tablespoons of Chicken Bullion (or Chicken Soup base)
  • 4-6 Chicken Thighs (de-boned)
Jasmine RiceBroth Base


Mix the water and bullion together until dissolved in the cooking pot.  Add the onion and then stir in the rice so it is even in the bottom of the pot.   Now place the chicken on top of this.  You might want to cut the thighs in half so you have a nice even layer.

Chicken and Rice Instant Pot Before


Put the Instant Pot lid on.  Make sure the vent is closed and press the rice button.  Then it will start cooking.  In about 30 minutes it will stop pressure cooking and go to low, it will beep to let you know.  Then wait 10 min and release the pressure by opening the steam vent.   When the steam is finished coming out you can take off the lid and you are done.  The chicken will fall apart and you can mix it with the rice.   Takes from start to finish about 45 min.

Chicken and Rice Instant Pot After


A big hint is to take the pot out of the cooker.  Otherwise the rice will burn on bottom since the cooking element in the cooker stays hot for a while after it is turned off.

Chicken and Rice


This recipe is a winner.   I have tried the same approach with turkey and thin cut steak.  Both were pretty good but not as good as the chicken.  You will probably want to add some salt and pepper but it is not needed depending on the bullion you use.

I have still not decided if it is going to be a part of the Fuse or not.   On the ease of use front, it is still easier to use the microwave.  I am not sure how much time it actually saves.  Taste wise, I can make some real good Chicken and Rice in the Instant Pot.   I am going to try several more things.   It will for sure be a part of the home kitchen lineup.  I am not sure it is going to be a fixture in the Motorhome. Time will tell.

Friday, January 19, 2018

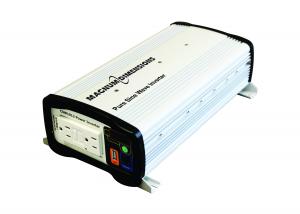
2018.5 Fuse Inverter


A new option for the 2018.5 model year is a 1000w Inverter.   The inverter will allow you to use some of your household appliances while not plugged in to shore power or using the generator.  But it won't power your air conditioner or microwave.


It is a Magnum CSW1012 pure sine wave inverter with a remote on/off switch and a CSWTS-15 transfer switch.  It has a 1000w capacity (or 8.3 110v amps per the specs) and can surge to 2000w for 1 second.    It is a pure sine wave inverter so it should work well with everything and not harm any of your delicate electronics.

You can get lots of information from the manufacturer at: http://www.magnum-dimensions.com/product-inverter/1000w-12vdc-pure-sine-inverter-csw-series.   The manuals and the spec sheet are located in the downloads section there as well.


The inverter is turned on and off with a switch located next to your ONEPLACE control panel.  When turned on, the green light will be on.

Which receptacles are connected to the inverter?  Not all of them are.

On the 24A-
The 110v plugs next to both the front and rear TVs are connected to the inverter.  In addition, the receptacle under the passenger side bed is connected to the inverter as well.

On the 24T-
The 110v plugs next to both the Front and Rear TVs are connected to the inverter.  The 110v receptacle in the front overhead cabinet and the receptacle on the front wall of the bedroom are also on this circuit.

One tip to I want to point out for curious folks,  Winnebago publishes the electrical diagrams/ plumbing diagrams/ manuals and other interesting information.  You can go to http://winnebagoind.com/resources/manuals/ and all of that information is there.

I do want to remind everyone that the inverter is not magic.  It puts out 1000 watts.  Your 1500 watt hair dryer will have a problem using the inverter since it will want more than the 1000 watts that inverter has to supply.   If you have the TVs on they will be consuming some of the power from the inverter as well.  Your single serve coffee maker uses around 600 watts and will be fine.

When the inverter is not in use, you should turn it off.  It consumes power when on even if nothing is plugged into it.  The manual says 1.2 DC amps with no load connected.   This is like leaving the lights on in the coach as far as current draw.  It will not kill you, but it will run the battery down if you are not careful.


One last thing I think that you should store away in a back corner of your mind,  the output plug for the inverter is a GFCI.  If you have a problem with all of the receptacles on the circuit not working and nothing else you try to do works the GFCI on the inverter might need to be reset.  Make sure you know how to get to the inverter since it is hidden in behind the pantry in the 23T and under the bed in the 23A.  You will need to pull out a drawer to get to it.   The CSWTS-15 transfer switch will probably keep this from ever happening, but you you should keep this in the back of your head.

Thursday, January 18, 2018

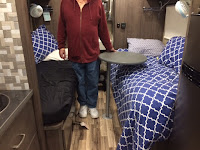
My New Table


Dons Fuse Table


I have a Fuse 23A and I keep looking for the right replacement for the table.    Don't get me wrong, the tables that Winnebago supplies are super sturdy. They are actually made to sleep on as part of the Flex-bed solution.  They are never going to break.

But they are big, unwieldy, and heavy.   Not the easiest thing to put up and take down.  And getting around the table when set up to get back and forth to the bathroom is problematic.

I have the Porta-Legs Solution.   I have tried using the Foot Stool.  We still have and use both of these, but they are just not a perfect solution when we stop for lunch at a rest stop.

Most ideas I point out are never mine.  I am just not that creative.  Several months ago in one of the Winnebago groups I saw a person had built  a tabletop out of a wine barrel lid.   I thought that was a great idea.  Then my hopes were dashed when I saw the price for the lid alone was $150.00.   Though very pretty, it was not in the right price range. But it got me to thinking.

I wanted to solve several problems.

  • The current tabletop is too heavy.  Designed to hold the weight of a human it was way overbuilt just to put a couple of plates and glasses on.   I want light.
  • I wanted to make it easy to get around.  The square tabletop gets in the way of my stomach when I try and scoot by.  If it was round, it would not get in the way so much
  • I wanted to be able to move it out of aisle as we were getting ready to sit down.  Winnebago had done this on the small table by offsetting the pole adapter so I would take their idea as well.

Dons Fuse Table bottom

So I started looking for a top.  Not being a master craftsman I needed something mostly finished and I found it.   Home Depot had 1x24" edge glued round blanks for  $11.00.  I wish it was a harder wood than pine but it should work.  Definitely in the budget.  Strong enough to hold dinner.  Not too big or too small.  And most importantly, if it did not work out, it would not be much of a loss.

Dons Fuse Table Base


I also needed a base for the table.  Amazon comes through again.  I ordered  a SurFit High Polymer Table Base.   Why polymer rather than aluminum?  It got better ratings and I was somewhat obsessed by weight.

Now on to how I built it.   First thing I did was to decide which face of the wood was the nicest.  Once I did that  I sanded it with a fine sandpaper.  The blank was already sanded very smooth so it just needed a little touchup.   Pretty easy task where the hard part was cleaning up the saw dust.

Dons Fuse Table Base Distance From Edge


Then I attached the base.  Like I said above I wanted it offset so I placed it a couple of inches from the edge.   I marked where the holes should be by placing the base on the wood round and marking where the holes were. I used a drill to create some pilot holes.  The secret here is to put a piece of tape a half inch from the tip of the drill bit so you do not drill too deep and punch a hole through the top.  (I have learned this lesson in the past when I was in a hurry).   I secured it with some screws (#8 x 3/4") and I had a tabletop.

Dons Fuse Table centered


Now for staining it and finishing it with some polyurethane. Not my strongest suite but it came out fine.  A pro could have done much better but it looks fine.  Sonya got to pick the color so you can ask her why so grey (consultations over the color probably was the most difficult part of this project.  (Sonya's note:  Some folks don't believe in blending colors so flat grey is what we ended up with.)).

Dons Fuse Table Aisle

Dons Fuse Table Sitting twistedDons Fuse Table Sitting Centered


It works well.   It can twist out of the aisle and you can walk by.   Twisted into the center it is easy to sit at.

So for a $20.00 project we now have a better tabletop.  We will leave one of the original tabletops at the house on our next trip and store the round one in its place.  We will try it out for a while and see how well it works.   It is definitely lighter, easier to set up/take down and much more comfortable to get around.   And if I find something better on our travels, it won't hurt to replace it.


Winnebago Fuse Compressor Refrigerators


This biggest change for the 2018.5 model year for the Winnebago Fuse is the change to a compressor refrigerator.

23T Compressor Refrigerator


This is a big deal!  The refrigerator now operates the same way as the one in your house.  A compressor circulates refrigerant around the refrigerator to keep it cool.  The main advantage to this is that the refrigerator no longer has to be level to operate.  It will also cool down much faster so you no longer have to turn the refrigerator on the night before you leave to have it usable.  It is also more or less maintenance free (at least as maintenance free as the one at home, keep the dust bunnies away).   But this is not a residential refrigerator.  It uses much less electricity.

Fuse 23a Outside refrigerator vents
Fuse 23A Refrigerator Vents
The older absorption refrigerator used ammonia as a refrigerant and if the unit was not level (or bouncing about) it would break.  On the positive side it would run off of LP gas.  The LP gas creates the heat to cause the ammonia to circulate.  Since there is a flame involved it has to be vented to the outside.  Another hole in side of the Fuse that could let hot and cold air into the motorhome.  You will not see the customary refrigerator vents on the outside of the new Fuse 2018.5.

Compressor refrigerators need electricity to operate.  Some people have expressed concerns about  this thinking that the Fuse does not have enough battery capacity to make this work for several days.   They are right to a certain extent, but Winnebago has gone to some lengths to alleviate these concerns.

Winnebago Fuse Batteries


First off,  2 Group 24 batteries are now standard.  That should provide enough power to run the refrigerator for a day or more sitting still.  They are also making 2-100w solar panels standard as well.  These will add juice to the batteries as the refrigerator sucks it out.  But what if the sun is not out?  Well if you are travelers like Sonya and I, if you drive down the road for an hour or two you will fully charge the batteries.  And if all else fails, if your batteries are getting low you can run the generator and charge them up.   For those that are really going out in the boondocks and staying for a while, Winnebago has made the battery trays bigger and they now can accommodate Group 31 batteries so you can store even more amp hours.  Not that I think it would be necessary for the way I use the Fuse, but it is always good to have the option.


2018.5 Winnebago Fuse 23T refrigerator2018.5 Winnebago Fuse 23T refrigerator control

2018.5 Winnebago Fuse 23T freezer2018.5 Winnebago Fuse 23T refrigerator open

The 23T has a Norcold/NovaCool model DE0061R.  It looks like a normal everyday refrigerator.  Freezer on top, refrigerator on bottom.  It runs on 12 or 110v automatically switching as necessary.  It is nice and large.  There should be no intimidation with this appliance.

One thing to note that this is not a frost free refrigerator.  If/when ice builds up you will need to defrost the unit.  

The manufacturer information for the refrigerator is at http://www.thetford.com/product/de-0061ev-0061/


2018.5 Winnebago Fuse 23A refrigerator2018.5 Winnebago Fuse 23A refrigerator open


The Fuse 23A has a Nova Kool model RFU6209 DC.   This one is 12v only.  It really does not matter since if you are plugged into 110v current, the converter in the Fuse will convert to 12v anyhow simplifying everything.  I like this since it keeps with the approach of keeping everything DC powered for efficiency.

2018.5 Winnebago Fuse 23A freezer


The different thing about this refrigerator is that the freezer is on bottom instead of on top.  Why would Winnebago do this?  Easy, with the 23A drivers side bed extension out for a tall person the refrigerator door is blocked.  By putting the freezer on bottom, the bed can be made out and you can still have access to the refrigerator.   A pretty decent design tradeoff if you ask me.

2018.5 Winnebago Fuse 23A refrigerator vent

Compressor refrigerators still have to vent the heat that they remove from the inside.  For the new refrigerator they vent the heat to the inside.  On the 23A, the vent is next to the couch.  

Both of these refrigerators use 4-5 amps when running (from Nova Cool manual).  Even in hot weather they should run about half the time.  This means these refrigerators will use 2-3 amp hours of electricity per hour.  Assuming 3 amp hours that is 72 amp hours/day which is pretty much worse case.    The capacity of the 2 type 24 batteries is about 160 amp hours which 80-100 is usable.  So you should be good for a day.  Now if you drive for an hour down the road your batteries will recharge.  The 200w solar should add back in 10 amps/hour if you are in a sunny spot which should mean you are better than even.  Upgrade your battery bank to Group 31s and you should be fine to boondock.


2018.5 Winnebago Fuse Refrigerator Measurements2018.5 Winnebago Fuse Refrigerator Measurements width

Now for the last question that is out there.  Can I retrofit my older Fuse with one of these compressor refrigerators.   I can only measure the 2017 23A vs the 2018.5 23A.   The refrigerator in the 2018.5 is 50" x 20".   The 2017 is 49.5 x 20.5.   It is close enough so it probably will but I would measure twice and use the refrigerators installation guide for exact measurements.   You would need to cap off the LP gas supply as well and re-do the 12v supply since on the 2017 the 12v supply is only active when the ignition for the Transit portion is on.