Thursday, March 30, 2017

Pink Stuff Mod


Editors note:  I am going to post another mod from  Richard Kozloski who has a 2017 Winnebago Fuse and is a member of the Facebook group.  He has modified his Fuse to make winterizing easier.    Please comment in the Facebook Winnebago Owners Group so Richard can respond to everyone directly:

Here are pictures of a mod I made to the pump pickup line to allow pumping anti freeze (pink stuff) for winterizing. Needed on 2017.0 or earlier Fuse. Some early 2017.5 Fuses might also need this mod.

I'm not going to screw the rear floor back down to make it easier to get to the pump for winterizing as it is a snug fit already.

Unmodified line to pickup side of pump.
Winnebago Fuse Winterization Mod


Unmodified view two.
Winnebago Fuse Winterization Mod


Disconnect line from suction side of pump.  You will cut this line and might remove about 3 inches.

Winnebago Fuse Winterization disconnect line

Parts needed:

  • 3 ft of clear tubing
  • fitting and cap for pickup end
  • Three way valve
  • Hose clamps
(Compression fittings off three way valve were not used because of difficulty getting them over the hose.  Would probably make a better seal if you have better luck than I did.)

Winnebago Fuse Winterization Mod parts


Cut the pickup side hose at a location that will allow you to insert the three way valve and still get all the hose under the floor without binding. I removed a short length of hose equal to the length of the three way valve.

Make sure the three way valve allows flow to pump from from either the pickup hose or  tank hose only when selected. If you have pump on wrong side you can't blow through when pickup is selected.  Valve as shown. (When you blow into the pump side of the hose it should only go out the position you have selected.)

Assembled replacement.

Winnebago Fuse Winterization Mod assembled parts


Reconnect the new assembly to the pump and orient the valve to your convenience. Connect the other end to the hose from the tank. Tighten all the clamps and fittings.

In this view the valve is set to pull water from the fresh water tank.

Winnebago Fuse Winterization Mod valve


In this view the valve is positioned to pull anti freeze from the pickup hose placed in the container.

Winnebago Fuse Winterization Mod valve


 I recommend you try pumping water from the tank and the anti freeze line to check for leaks and to make doubly sure you have everything connecter correctly before you button things up.

Just for completeness here is photo of fresh water tank drain. It's function was not changed by this mod.

Winnebago Fuse Winterization Mod drain


Tuesday, March 28, 2017

Lifting the Fuse - The Parts

Editors note:  I am going to post a series of emails from Richard Kozloski who has a 2017 Winnebago Fuse and is a member of the Facebook group.   He has decided to have his Fuse lifted and he is being nice enough to share his experience.  Please comment in the Facebook Winnebago Owners Group so Richard can respond to everyone directly:

Crawling around under the Fuse last week  and found these tags on the parts from my upgrade.
Also rear leaf spring has a big “Ford” painted on it.

They are definitely Ford parts but I can’t say for sure they are Transit.  I haven’t been able to look them up at the local Ford dealer yet.

Ford Transit/Winnebago Fuse Front Spring
On Front Spring

Ford Transit/Winnebago Fuse Rear Leaf Spring
On new extra rear spring leaf

Sunday, March 26, 2017

Omnidirectional Air Conditioning Install

Editors note:  This is a post from the"Travato Owners and Wannabees" Facebook group by Greg Schultz.  The photos are his also.  I believe we have the same Coleman Air Conditioner.  This is reposted with his permission.   -  Please post comments on the Facebook group since Facebook is where it originated.

OMNIDIRECTIONAL AIR CONDITIONING GRILLE INSTALL. Today I received and installed the Coleman Chill Grille assembly with omnidirectional vents. It is definitely a big improvement but you'll have to determine for yourself if it is cost justified. Rather than wait for the ceiling assembly upgrade kit which will be coming out in May, (repair part number 9470-3501, price and content unknown), I went with the available whole ceiling assembly, model 9430D7153. $81.35 from PPL on line. When you look at the pictures you'll see - "whole ceiling assembly" is just that, the whole kit and caboodle. But, forgetaboutit. . all I did today was remove the existing grille cover and replace it with the new one so I've got extra parts for James. Pull off the two control knobs. Remove the two return air filter covers by pulling on the tabs and remove the filters to expose four screws holding the cover in place. Put the new cover in place and secure with the four screws. Replace the filters and covers and control knobs and pour yourself your beverage of choice to celebrate. (NOTE: It does nothing to make the unit more quiet - there are now two more places for the sound of the fan and compressor to enter the coach.) Actual assembly time, less than 15 minutes. Oh, and I can see value in this for both G and K.


Coleman Chill Grille - Greg Schultz

Coleman Chill Grille - Greg Schultz


Coleman Chill Grille - Greg Schultz


Coleman Chill Grille - Greg Schultz


Coleman Chill Grille - Greg Schultz


Coleman Chill Grille - Greg Schultz

Coleman Chill Grille - Greg Schultz


Coleman Chill Grille - Greg Schultz

Coleman Chill Grille - Greg Schultz

Coleman Chill Grille - Greg Schultz

Thursday, March 23, 2017

Fuse Air Filter


Well it is Spring and time for some general cleaning and maintenance.   One of those things that has been on my list for a while is to inspect and possibly replace the engine air filter.

I have had diesel engines in vehicles for the last 15 years.  I am not a mechanic, but the one thing I do know is that if you want to keep a diesel happy you need to feed it clean fuel, clean oil and clean air. As long as you do these things it will last forever and run great.

My Fuse has about 10,000 miles on it now and when I had the oil changed at 5,000 miles I did not look at the air filter personally.  I doubt the oil folks took much of a look at it either.  So I wanted to take a look.  I also wanted to knock out anything in it since here in Tallahassee, the pollen is horrible in the Spring.

Before I did this, I purchased a new filter in case I needed one.    I got mine from Amazon.   It is a Motorcraft FA1916 Air Filter and was reasonably priced.   I thought about purchasing a K&N 33-5024 Replacement Air Filter.  It provides better air flow and will improve power and mileage.  I have a K&N in my Ford diesel truck and got 2mpg more than the stock Ford air filter.  In this case I decided to say with the Motorcraft parts.  The price difference was just not worth it.

Motorcraft Air FilterFA-1916 Air Filter

Before you start you need a Torx T-20 screwdriver or bit for a ratchet.  I point this out in case you do not have one handy.  It is not something in every toolbox.

Torx bit

I found out quickly this was not going to be the easiest task.   Everything is pretty tight in the engine compartment and the air filter is tucked up in the left hand side.  So I got started.  

I first took a look at the owners guide.  It lays out the steps pretty good.  In my book it was on page 232.  Call me chicken, but I am learning to at least take a glance at the manual before you get deep into a project.

Winnebago Fuse engine air filter

There were several steps.    Read the manual, it is really good about the steps needed.
  1. Disconnect the big hose on top. (needed a standard screwdriver to loosen the clamp)
  2. Take out the air flow sensor.  2 screws hold it in. (needed a T-20 torx driver)
  3. Take off the air hose under the air filter top.  You need to pull firmly.
  4. Pop the 2 clamps on the front of the filter housing
  5. Push in a latch on the front top right hand side while lifting up slightly 
  6. Pull slightly forward and then lift right off
But Huston, we had a problem.   I could not get the air filter cover out of the space.  There was just no way to twist it to get it out and no advice in the manual.   After staring at the problem for a few minutes I figured it out.   You had to take loose the window washer fill tube.  You know that tube with the blue cap in the photo.  It uses the same T-20 torx screw as well.  I took it loose, pushed it slightly to the side and then the cover could come right out.

2017 Winnebago Fuse Air Filter


After 10,000 miles the filter was pretty clean.  No need to replace it.  Well I swapped it with the new one anyhow.   I had it, so why not.  I put the used one on the shelf in case I need it later.  I like having a spare air filter on the shelf.  I have an entire selection of filters for the F-250 but that took a while to collect.

I then put it all back together.   You really do need to check the air filter on a regular basis so the scraped knuckles were worth it.

Monday, March 20, 2017

Lifting the Fuse - Videos

Editors note:  I am going to post a series of emails from Richard Kozloski who has a 2017 Winnebago Fuse and is a member of the Facebook group.   He has decided to have his Fuse lifted and he is being nice enough to share his experience.  Please comment in the Facebook Winnebago Owners Group so Richard can respond to everyone directly:

If a picture is worth a thousand words than a video is worth a million.   Richard has provided some videos to help see the differences in clearance before and after the suspension modes he did.   He is running the camera and the suspension tech is the one driving like a madman.

A video of Richards Fuse before the suspension modification:


A video of Richards Fuse after the suspension modification:


Saturday, March 18, 2017

2017 KOA North American Camping Report


I found this the other day and find it kind of interesting. The  2017 KOA North American Camping Report is the third year KOA has done a study on camper, who they, what they are doing and what is important to fellow campers.    They surveyed not just KOA guests but people in general.

I find it interesting and it helps to understand why Winnebago and the other manufacturers are targeting younger customers.   That is where the growth is.

Monday, March 13, 2017

Fuse Backup Camera Mods


Editors note:  This is another article from Richard Kozloski who has a 2017 Winnebago Fuse and is a member of the Facebook group.     Please comment in the Facebook Winnebago Owners Group so Richard can respond to everyone directly:

This article with high resolution photos and suitable for printing is available for downloading as a pdf at:  https://drive.google.com/file/d/0By_GWZtlcHblZ1M0Q2l1Y3htbzQ/view?usp=sharing

2017 Fuse Backup Camera


Here is a simple fix for the clearance problem limiting the Backup Camera from being adjusted upward.

You will need a 3/32 inch hex wrench. Preferably one with the “ball end”.

Remove all screws from both sides of the camera.

Reposition the camera so that when a screw is placed in the middle hole on the bracket (the pivot hole) it will thread into the upper hole on the camera. Perform on both sides and tighten finger tight.
Thread a screw through the lower arc hole of the bracket into the middle hole of the camera. Perform on both sides.

Adjust camera to angle that makes you happy. Tighten screws. Don’t overdo it and strip the holes in the camera. You only get one screw up, pun intended.

On my RV i now have equal space above and below the camera and could adjust it for racoon hunting if I wanted. I set mine so that I can see everything from 20’ down to 2’ from the bumper. I wanted to see what’s behind me on the road more than what’s close on parking. I have a mobile remote obstacle detection system on my rig. (Wife yells when I get too close to things.)

Stock Camera
     Bumping against top
Fuse Backup Camera - Before

       Side View
Fuse Backup Camera - Before

Fixed Camera

       Side View (Note two screws)
Fuse Backup Camera - After

        Note equal clearance
Fuse Backup Camera - After


Saturday, March 11, 2017

Lifting the Fuse - The Details

Editors note:  I am going to post a series of emails from Richard Kozloski who has a 2017 Winnebago Fuse and is a member of the Facebook group.   He has decided to have his Fuse lifted and he is being nice enough to share his experience.  Please comment in the Facebook Winnebago Owners Group so Richard can respond to everyone directly:

This article with high resolution photos and suitable for printing is available for downloading as a pdf at:  https://drive.google.com/file/d/0By_GWZtlcHblTUg1SG5ad09hVmM/view?usp=sharing


2017.0 Fuse 23T Suspension Upgrade

Selecting the right components to get a 2-4” lift for the early 2017.0 Fuse is not just as simple as finding the components on line and just putting them in yourself. First there are very few options that will work because of the limited space under the chassis between the springs and ties. This is a log of my experience in finding the correct components.

My first stop was to the Ford dealership to find out if they had any information on parts from the 2017.5 Transit that could be swapped out. Unfortunately all the 2017s are still new enough that they don’t have info on any of the 2017s at the parts department. I was directed to the fleet manager.

Ford does have parts that can be used to upgrade fleet vehicles. Unfortunately at my dealership these were limited to the basic Transit low roof and high roof vehicles T150, T250, and T350. They didn’t have much for the Cassis Cab or Cutoff Chassis HD styles. Everything was limited to work truck versions and no suspension lifts. Additional research by the fleet manager lists our Winnebago Fuse chassis as a 2017 Transit Chassis Cab T350HD 178” DRW. We could not find any specific information on the differences between the 2017.0 and 2017.5 chassis. My brother-in-law works in the truck parts department of a major Ford dealership in Massachusetts. He ended up confirming the lack of information available at my local Ford dealership as he didn’t have the information either.

This put the skids on my being able to get parts directly from Ford. However, the fleet manager did recommend two businesses here in Albuquerque that they use for fleet upgrades. McBride Spring & Suspension and Ultimate Truck & Trailer. Both had very knowledgeable people with lots of suggestions and information on what not to do and why not. I ended up going to McBride as they had more experience with RVs and they had installed the airbags in my Navion.

As an aside the fleet manager recommended I contact Quigley 4x4 as they make a four wheel drive Transit and see if they might offer a lift kit package. Unfortunately they don’t offer their lift parts separately at this time. Also they can’t put their parts on a diesel Transit due to weight limitations on the front end.

They would have to get a chassis from Winnebago, mod it to 4x4 and ship it back to Winnebago for the RV build. Then Winnebago has to strip stuff out of the RV to make up for the extra 4x4 component weight. Is someone is working on a Winnebago/Quigley 4x4, no comment from either end. Probably would be the 4x4 Era Winnebago showed at a RV show last year anyway.

It’s a good thing they are not offering a Fuse-able conversion as I would have to figure out how to ask the wife if I could spend $12,000 without being killed. I don’t think that is possible and I’m too chicken to even consider it. ;-)

My vision of a four wheel drive Fuse tooling along the back trails of Moab with the jeeps fades into the sunset. (Maybe too much Crown Royal.) ;-)

page1image27312
Enough of the research. Off to McBride to get a list of the choices available and to finalize what needs to be done.

Let’s break this down to two parts. Front end mods and rear end mods. Both ends need to be modified so the rig remains level when driving down the road so the refrigerator will work on propane. (How may of you ever considered that the limiting factor on what and how you do the mod would be the refrigerator?)

Front end mods:
Whatever you do you are limited here by how much lift you can add and still get the front end alignment back into factory specs. The other factor is being able to use the factory brake lines steering rods and other suspension parts.

There are basically two ways to do the front end modification. One is to place a rubber or metal “lift block” above spring and keep all the factory parts. The other is to replace the factory spring with a longer and slightly stiffer spring.

McBride recommended the spring. Their reasoning is that even though it would cost a bit more that in the long run it would be better on the suspension and tire wear. Strangely it was also easier to swap the spring than to add a block. Access to the top of the shock tower is inside the cab behind the dash. I opted for the more expensive spring and the slight cost increase, due to the reduced labor cost.

Rear end Mods:
Here it gets little more complicated as at first glance there appears to be more options. However, the number of options soon dropped due to our T350HD chassis type. The major limiting factors are the length of the brake lines, traction control cables, and clearance around the axle.

Because I have experience with air bags on my two previous RVs, one a Navion 24J, I wanted to add two 5000# air bags and a dash controlled air pump for the rear suspension upgrade.

McBride agreed that this would be a great idea due to the better cross wind handling smoother ride and the option to adjust the ride height. Then we tried to find an air bag setup that would work.  Result equals zero. The owner and mechanic crawled under the vehicle with air bags to check but here is not enough clearance around the bags over the axle to safely mount anything they could find. The Ford suspension components are too close to the air bags for safety. If we had a T350 chassis it could be done but not the T350HD. Scratch my dream ride chassis.

Next, and cheapest, option is to place a “lift block” between the axle and the spring. This would give the required lift and is the cheapest. Another option is a complete leaf spring replacement. Unfortunately expensive. You can get close to the same results with a leaf spring helper. You can choose the height you want and the added benefit is you can choose the additional weight carrying capacity you want. You can get more CCC, but don’t go overboard and kill the ride quality.
page2image27480 page2image27640
This is the route I chose. (Mods are for a Fuse 2017.0 23T but should work on a 2017.0 23A)

On the front:
McBride found a spacer block that mounted on top the spring strut tower assembly with only minor modification. This gave a 2” front lift and didn’t significantly change the front end alignment. Only the toe in was changed and easily brought back into specs. Major cost was labor to remove the strut assembly, install the lift block and get it back into place. The space is extremely tight.

On the rear:
A large 3” truck/trailer spring was installed. Ironically after Ford dealer said they didn’t have a part it turns out this is a part for a Transit. Its a “Leaf Tempered 3” x 499-60” spring. It has the Ford label painted on it. It is installed between the factory spring and the axle. I will be showing the Fleet dealer to see if he can give me a part number.

The final result is, overall ~2” of lift:
clearance on the lowest point center rear goes from 13” to 15” clearance on the lowest point center front goes from 14” to 16” clearance under the step retracted goes from 8” to 10” clearance under the step when out goes from 6” to 8”


Cosmetically when viewed from the side you have to really compare the before and after photos to see any difference.

Taking it home:
Well the drive home made it clear that it was the right decision for me. The overall ride appears to be better and the wind induced side roll is definitely better. (35mph gusts driving home through the canyon) And the clearance over the curb coming out of the Spring Shop and up the driveway was apparent. No butt drag either place.

Is this worth the money spent only time will tell. But considering the potential cost of ripping off the rear end or steps a couple of times I’d rather limit the damage by spending the money up front and not have to worry as much later. 

Pictures Before:


Winnebago Fuse Suspension Front

Winnebago Fuse Suspension Steps

Winnebago Fuse Suspension - Rear


Pictures After:
Winnebago Fuse Suspension

Winnebago Fuse Suspension - After Steps

Winnebago Fuse Suspension - After rear


Things I found out not to do:
You may be told that whatever you install is gong to give you more CCC. This is partially true. Springs may be stiffer and be rated for more carrying capacity. However, you are still limited by the manufacturers (Ford) GVWR. This is the max allowable weight of the fully loaded vehicle. Also you should not exceed the GAWR for either axle. In the rear these are limited primarily by the springs, axle, wheels, and tires. Increasing the capacity of the springs will give you more CCC but only if the other components limits are not exceeded. Same for the front, and the weight of the diesel already takes away from what you can do without exceeding the front axle limit.

Make sure that whatever you do does not cause problems with the brake lines or the antilock brake cables. Ensure you have enough play throughout the modified max travel.

Make sure the installer pays attention to the left to right as well as the front to back leveling. Check that the refrigerator is level, or at least as level as it was from factory.

Timbrens or SumoSprings are not the way to go. They are bump stop replacements and if installed properly to factory specs are not for ride height adjustment. You are suppose to leave ~1 inch between the bottom of these bump stop and the axle so the factory spring carries the load. These units aren’t supposed to kick in until the springs come close to bottoming out. Neither of these is designed to give more CCC and are meant for sway reduction and to reduce the impact of bottoming out. 


Friday, March 10, 2017

Lifting the Fuse - Before

Editors note:  I am going to post a series of emails from Richard Kozloski who has a 2017 Winnebago Fuse and is a member of the Facebook group.   He has decided to have his Fuse lifted and he is being nice enough to share his experience.  Please comment in the Facebook Winnebago Owners Group so Richard can respond to everyone directly:

Will be dropping the Fuse off at the spring shop Wed morning.  I am having helper springs installed in the back and new coil over springs in the front. This should get ~3" more clearance. Will provide all the details after i get it home either Thur or Fri.

Wanted to get air bags in back but there isn't enough space for them. This is the only option the spring shop and local Ford recommended.  This shop is the Ford fleet authorized shop in Albuquerque. Learned quite a bit about why we can't  have a lot of the various options people think are available.

-----------------------------------

OK.  IT IS UNDERWAY !!!

Dropped the Fuse off at the spring shop this morning. Should have it back Friday. They will be replacing the front springs with taller ones.  Will know the exact amount of lift until tomorrow. Between 2-4”

The boss wasn’t in but the guy doing the work thinks he can get a set of AirLift airbags under the back with just a little mod to the kit. He needs boss to approve and cost it out. The plan is he will finish the front end and then lower it back down.  At that point he and the boss will crawl under the rear and see if they can add airbags and remote controlled inflator pump.

If they can’t install airbags then I’m going with lifter blocks between axle and spring.  The exact height depends on lift at front to keep rig level.  This is what I would recommend to others as it is cheapest and doesn’t change ride enough to notice according to spring shop. However, I want the airbags as I’ve had them on last two rigs and love what they do for handling. I’m willing to pay the extra for them. (It’s only money and if I don’t spend it the government gives it away.)  Don’t forward this to my wife.   ;-)

Couldn’t get under the rig at the spring shop to get before pictures of the stock components.  Definitely can’t get under it at home at current height. Here are photos of the stock heights.

      Stock Height Front              
Winnebago Fuse Clearance


     Stock Step Down            Stock Lowest Point Rear
Winnebago Fuse ClearanceWinnebago Fuse Clearance


       Stock Suspension Rear
Winnebago Fuse Clearance


Please post comments on "Winnebago Fuse Owners" Facebook group 

Saturday, March 4, 2017

A Year of Fuse Blogging


It's the first anniversary of the conFUSEd RV blog.   It seems like a good time to look back on where we have been and where we are going.

When I started the blog a year ago I was not sure what to expect. I was not even sure of what I was doing.   I had written a blog before, but this time I decided to make a real commitment to the project.

The reason I started the conFUSEd RV was I wanted to give something back.   I had relied on Internet  blogs and forums for the previous two years while we were trying to find the right RV.  Once we got the Fuse I started writing the blog to repay all the help I got.

When we started the blog, the Winnebago Fuse was brand new and there was not much information out there.  I wanted to fill in the some of those blanks.

Writing about the Fuse was easy.  Not just because I was excited.  I could just write about almost anything about the Fuse and it was new.  So I did write about almost everything starting at the front and working around the vehicle.  Since there was not much out there I was pretty sure it would be helpful.   This gave me the time to find my voice.  I needed that time and I think I found it.

175 posts and a year later I know I am getting better at this (no comments from Sonya). I do appreciate everyone being patient and staying with us.

We have had over 93,000 page views.   It is really humbling when I think about it.   People are actually reading the posts.

Chart

I have been even more humbled with people asking me questions.  Not having much experience with RVs, I don't feel I am an expert but I am willing to share.  It was mind blowing when someone came up to me at the Tampa RV show and asked if I was the 'confused guy'.  I did a double clutch on that one.

The most popular post that we have done was the one entitled Why a Winnebago Fuse 23a.  It has had 1400 page views just by itself.  The other ones that were Fuse reviews or Fuse comparisons seem to be read more than most others.

The success of the blog has been in no small part related to the Facebook group.  I started the Facebook group and a yahoo group for the Fuse at the same time.  It was more or less an experiment when I set it up.   It became apparent real quickly that Facebook was way more popular. Never would I have guessed that it would take on a life of its own.

Chart #2

I have read over the years that people like to form communities.  We have formed a great community.  In the 10 months the group has been in existence, we have attracted around 300 people to join our group.  We even have attracted the attention of Winnebago and several of the dealers who watch what we are talking about.

I have really enjoyed meeting several of the readers.  My first experience was meeting Norbert Gonzales. I was not even in my Fuse but when I read another Fuser  was in the same area I made a beeline to visit.  It was great.   It was like we had known each other for years and that was the first time we had ever laid eyes on each other.  Sonya and I have had several other great visits with fellow Fusers and I hope we can have more.  The fellowship is the just the best.

So where do we go from here?

We have the "Get Together in the Smokies" coming up in April.  Who would have thought that 15 rigs would have committed to be there two month ahead of the event.  I thought it would be successful if we could get 5 Fuses in the same place.   We will have to see if we can do something similar for the Fuse folks in the West.  The demand seems to be there.

We created the Flashcards.  It seems like a good idea so we will see if people like them.  It would be nice to expand them out the the 23T as well.

The RV WiFi book was also an interesting experiment that worked reasonable well.  Maybe some more pamphlets/booklets if we see something where it would help.

Sonya has said she will write some more in the future.  People seem to like her posts so I think this would really help the blog.  I am also excited that I have been approached by several members about guest posts.   I think this would be great and add some more perspective.

And videos.   This is a tough one.  I made one this year and I am not sure anyone liked it.  I will probably give it another try or two but I don't really think like a producer.  I can write and re-write in the blog much easier.

Never the less, I will continue to write more posts.  I have several more in the hopper as we speak.  Sonya has an idea for some more helpful hints.  We will continue to let everyone know of our travels.

I do want to thank everyone who is a reader.  Without you this would not have been successful.   So at this point I raise my glass to you all and say "Thanks for reading and to even a better year ahead"

Don

Wednesday, March 1, 2017

Princesses and the Fuse


Ft. Wilderness Princesses


This past weekend, I took my daughter and our friend to Walt Disney World where they ran the Disney Princess Run.  This was not the Fuse's first stay at Disney's Fort Wilderness Campground Resort, but it was the first time Don was not along to take care of things. (And I generally, do let him take care of as much as I can get away with.)

We had prepared for the trip.  I had started driving the Fuse and enjoyed it.  Don even was able to take a nap in the back while I drove on our previous trip.

Don had prepared flashcards on basic set-up subjects to help us on the trip.  The subjects covered were:

  • Parking
  • Adding Water to Tank
  • City Water
  • Slide out
  • Awning
  • Cable TV Setup
  • Electrical Connection
  • Dumping Septic Tank


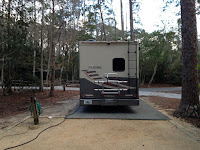
Parking the Fuse into its assigned camping spot was my responsibility.  I did it.  Not smoothly or on the first try.  But, I did eventually get it in the spot without hitting trees or people or damaging the Fuse.  (In the Fuse's defense, I don't think it is the problem.  I also had problems backing up the golf cart with the girls telling me to watch out for the tree and the RV.)  Luckily, we had an easy spot without trees close to the pad.  The pad, however, was not that large as the campground was overbooked and we were asked at check-in to downgrade to a smaller spot usually used by pop-ups and tents only.


Winnebago Fuse at Ft. Wilderness


Cathy grabbed the flashcards and went to work on hooking up the electric and cable.  The cable connected quickly.  The electric was connected, but the surge protector never came on.  We waited, still nothing.  Cathy re-read the flashcard instructions and so did her friend, both noting that Don included a note that you could 'verify that the power is on if the microwave clock is on'.  So now one girl is on the outside of the Fuse re-doing the set-up steps while one is inside the Fuse staring at the microwave giving regular reports that the clock is not on.  (Can I just say I love these girls.)  Alas, no power was coming from the pedestal.

A call to the front desk of the campground had a electrician there in less than half an hour.  By then I had been able to jiggle the switches enough to get the power on and verify that we had hooked up correctly.  Hooray for us!  The Disney electrician still replaced the electric box mentioning that it had a short in it, that may or may not, have had anything to do with the dead lizard he found inside the box.  Within an hour we were hooked up and ready to go.  Okay, the girls had already left to get their race packages, but I was ready to head for the Polynesian to start vacationing.

Ft. Wilderness Power


After a late dinner at the Polynesian Resort, we returned to finish setting up. While I went to retrieve our golf cart from the front of the campground, the girls went directly to the RV and following the flashcards were able to get the slide out, awning deployed and the sofa bed ready.  Yes, it was much later than we planned and they needed to be up at 3:00 am to get ready for the race.  To bed we went, but I had an inkling that an additional flashcard was needed as the door light and awning lights remained on regardless of my daughter flipping multiple switches.  (This was confirmed the next night as I noticed our guest sitting on the couch reading without a light and pointed out the pod lights to her.  She'd noticed they hadn't come on, but thought they weren't working.)

Now for my confession.  We did not field test the flashcard on dumping the tanks.  Because we were in a loop for pop-ups and tents there was no sewage hook-ups.  Disney did volunteer  to provide us a site to use on Sunday morning so we could dump before we left, but I declined.  Frankly, I didn't want to back into another spot and since the tanks still registered as emptied Don agreed we could take care of it later.  So sorry YouTube, no "Can an Actuary, an Attorney, and an Accountant ....." video this time.