Thursday, June 15, 2017

Perfect Size for 1 - A Cake in a Cup


I need dessert.  OK I don't need dessert, but I find it nice to have something sweet for dessert that is a treat.  Fresh, warm, a change from the normal makes dessert a real treat.

In the motorhome it is hard sometimes to come up with something that does not take a lot of time or needs a lot of supplies to make.  It also needs to be done in the microwave, since that is what we have to work with.

We were walking through Walmart in the cake mix section and found "Duncan Hines Perfect Size for 1" cakes.  A personal sized cake that you make in a coffee cup and "bake" in the the microwave.   I thought this was pretty unique, so I bought a box.

Duncan Hines Perfect Size For One


The box contained 4 individual packets.   There were several flavors at Walmart to choose from.  I purchased "Caramel Cake".   There were also "Brownie",  "Vanilla Bean Cake", "Confetti Cake" and "Carrot Cake".   If you look on the Duncan Hines web site there are even more flavors.

They were really easy to make.   Pour the contents of the pouch in a 12 oz coffee cup.  Add 3 tablespoons of water and stir.   Microwave for 70 seconds and you are done.   Just that simple.

Perfect Size for 1 instructions

Perfect Size for 1 step 1Mixing Perfect Size for 1


It came out great.  Pretty good, but the cake had that store bought taste.  On the next one, we took the advise on the pouch and substituted milk for the water.   It made the cake taste richer and more home made.

Perfect Size for 1 after bakingPerfect Size for 1 first bite


It was good and I will add this to the list of motorhome food.   I want to try the other flavors and come up with a variety we like so we can have something different while we are out.  The other thing for traveling in the Fuse will be to ditch the box.  The packets have the cooking instructions on them and it will remove 1/3 of the space needed to carry them.

But with everything good there is a downside.   320 calories and 35g of sugar.  I know why it was good.

Perfect Size for 1 nutrition


Tuesday, June 13, 2017

The Generator and Power Draws


Onan QG2500LP Generator - Onan-Cummans photo
One thing you have to remember when using the generator on the Winnebago Fuse is that is not capable of powering everything in the coach at the same time.   The Onan QG2500 that is supplied with the Fuse is capable of supplying a constant 2500 Watts which is 20.8 amps and has a 25amp breaker for self protection.

If you try and use more than 25amps, you will trip the circuit breaker that is physically located on the generator.  Actually it is under the access panel on the QG2500. Resetting it on the 23A  means crawling around underneath the Fuse to get to it.

So what can I run while on the generator?  The simple answer and rule of thumb is one large appliance and several small things.   The large appliances are the: air conditioner, microwave or water heater (on electric).  

Small appliances do NOT include your space heater or your blow dryer.

The generator can handle and run anything that is in the Fuse, but not in certain combinations.   Let's look at the power requirements of the big appliances to see why.

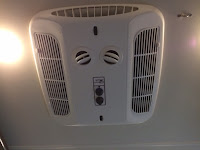
The Coleman Mach 10 air conditioner uses 1350 watts.  Depending on high or low cool it uses between 13.2 - 13.6 amps.   That is when the compressor is running.  When just the fan is running it uses 2.5 amps.   That leaves 7 amps for everything else.

Air Conditioner


The water heater uses 1400 watts when set to use electric, 11.9 amps.  That would leave 9 amps for everything else.   But why would you use the hot water heater when on generator, just let it use LP gas to heat water for you when using the generator.

Atwood Hot Water Heater

The microwave uses 1500 watts or 12.5 amps.  This leaves 8 amps for other things.

Microwave


The refrigerator can also run on generator power.  Not a good thing to do unless you are out of LP, since it can use LP also.   It will only use 2.5 amps when on AC power.  Not a large draw, but some power never the less.

Refrigerator


From this you can see that any combination of the above other than the refrigerator will cause you to go over 20.8 amps.   This will cause the generator to stall or it will trip the breaker.

There is one other load you need to be aware of and you can't turn it off.  The battery charger/converter, a Progressive Dynamics 9245c, uses 725w or 6 amps.  It can use less, but if your batteries are low it will use all 725 watts and you can not turn this off.

What else is there that would use power from the generator?  Whatever else you plug into a socket.   The good thing for us is that the Fuse powers most everything else that is built in from the battery bank.  These systems are all 12v.  Using these on while on generator might cause the converter to work harder, but they will never use more than the converter can supply.

A good reference is published by Cummins/Onan.  It is called the RV Generator Handbook.   Take a look.  There is some good information and a list of common power requirements.

Not really related but while I was making sure I did not miss anything I captured what was on the AC portion of the electric panel:

Looking at the 120v breaker panel:
Main30 Amps
Converter15 Amps
Air Conditioner20 Amps
Refrigerator15 Amps
Microwave20 Amps**Water heater is on this circuit
Receptical 215 Amps**Entertainment/TV areas
Receptical 115 Amps**Everything else

Winnebago Fuse Electric Panel
***** Update *****
I took another look at the electrical drawings.  The Microwave and the Water Heater are on the same circuit as stated above.   They are on a relay that causes the electric portion of the water heater to turn off when the microwave is running.  This way the draw stays under 20 amps.

Saturday, June 10, 2017

Microwave Pasta & Meatballs


I saw something interesting the other day and had to try it.   I did not know that there was such a thing as microwave pasta.  I had seen a microwave pasta cooker, but this is pre-cooked pasta that you put in the microwave for 60 seconds and you are ready to go.

Barilla has come out with a product called Ready Pasta.  It is pre-cooked pasta in a retort package.  I have had some pasta like this before that had a twang.  I was a little skeptical on how well this would taste.  It tasted great.  It was not fresh made pasta by a long shot.  Just about as good as the dried pasta you get in a box.  The texture is a little denser than normal pasta, but the package claimed al dente and it gives that impression.

Barilla Ready Pasta


I tried the Ready Pasta with a little butter and parmesan cheese and it was pretty good.  The price was $1.69 per package.  Not the cheapest, but well worth it for the convenience.

Plain pasta does not a meal make.  I wanted something close to Spaghetti and Meatballs. They don't have spaghetti but they had rotini.  So I decided to make rotini and meatballs.

So I picked up some Publix meatballs in marinara sauce.   These Publix entrees have been really good in the past so it was well worth a try.   It was great.  The sauce was not bland.  It was much better than Ragu and had a little spice in it.    The meatballs tasted outstanding.

Publix Meatballs in Marinara Sauce


It took 6 minutes for the meatballs to cook in the microwave.  An additional 1 minute for the pasta to cook and I had a meal.   It smelled so good I forgot to get a picture before I dug in.

Rotini and Meatballs

It was a good meal,  enough for the two of us made entirely in the microwave.   Very tasty.  The meatballs were $5.49 and the Pasta was $1.69 so the total cost was about $7.00.   This is prefect for the motorhome.  Everything was cooked in the microwave, so no heat was added to the coach.  It was very tasty and will add to the variety of food we have while on the road.


Wednesday, June 7, 2017

Husky Floor Mats


Since we have purchased the Fuse we have been looking for floor mats.  Our first choice was to purchase a set of WeatherTech floor mats.  Problem was that we were unsure of which ones to order and how well they would fit.  So we waited to see if some one else would take the plunge and then we would follow.

Before we got around to it another option became available.  Husky Weatherbeater floor mats.  They  showed up as an option when Patsy Stair on the Facebook group posted some pictures.  They looked great.   The best part was that they were $50.00 less than the WeatherTech ones we were looking at.

Husky Weatherbeater


So we ordered them from Amazon.   The exact ones were Husky Liners Front Floor Liners Fits 15-16 Transit-150/250/350.   We ordered and they were delivered to the front door a few days later.  You have got to love Amazon Prime.

Husky WeatherBeater Box

They were nice and heavy duty.  I had not seen them before other than in pictures.   They fit perfectly and took maybe 5 minutes to install.  I did it by myself with no problems.

Husky Weatherbeater Floor Liner Drivers Side. Ford TransitHusky Weatherbeater Floor Liner Passenger Side Transit

It is a one piece unit.  Covers the floor boards on the drivers side and on the passenger side and the space in-between.  They are designed to sit on top of carpet as opposed to the vinyl that is on our Fuses.  This did not matter since they fitted so well there is no movement.

These are a little bit thinner than the WeatherTech floor mats I have seen in the past.  They are also more vinyl than rubber which is another difference.  I don't think that this makes much difference for our purposes.  The price more than makes up for it.

I did fine one thing funny.   The installation instructions had a note:  "The use of Armor-All is discouraged since it make the surface slippery". 


Monday, June 5, 2017

Camco FasTen Blocks


FasTen leveling blocks


I have avoided buying leveling blocks up to now.  I still have not needed them.  So far I have been able to move the Fuse back and forth a foot or two everywhere we have stayed and get level.  This is one of the benefits of having a small motorhome.

 I wanted to look up underneath the Fuse at the generator.  To get my rather rotund body underneath I needed to lift the Fuse several inches.  That way I would be able to maneuver around while under the vehicle.  Since I was going to be the one under the Fuse,  I was not going to skimp.  Remember,  safety first.

I purchased the Camco 44515 FasTen leveling blocks.   These are designed for motorhomes with duallies.  Both wheels are supported which is a good thing.  The weight is spread out the way the vehicle is designed.  I could have purchased the standard 2x2 blocks and been fine.  I just want as much margin as possible especially since I knew I would be using these blocks while I was underneath the Fuse.

I purchased the blocks in brown.  At the time they were cheaper than yellow but I have seen that the price changes back and forth.   The color was not important to me.

Camco dually leveling blocks


 They come as a set of 10 blocks. They go together like legos.  Just like most of the blocks on the market.   The first block will raise the vehicle 1.5 inches.  The next layer of blocks will raise the vehicle an additional inch because of the way they stack.

Camco leveling blocks height

A set of blocks 3 layers deep will take 6 blocks and raise the vehicle 3.5 inches.

Camco Leveling Blocks attached


They work.  It is rather a simple and elegant solution to the problem.  One of the best parts of the FasTen is how they are stored.  There is a screw in handle that goes through the center of the blocks that keeps them together.  It also acts as a carrying handle.

Camco FasTen Blocks handle

I am not sure if they will get used much, but they are good to have just in case.  They really help if you are going to get under the Fuse to do maintenance or just look around, especially if your belly is as big as mine.

Saturday, June 3, 2017

OBD-II

OBD-II - On-Board Diagnostic 2 is a diagnostic bus on all modern cars used by technicians to diagnose any errors and interface with the computer in  your vehicle.   It provides an interface to your cars computer to see what is going on and read the diagnostic logs that are kept.   All of the measurements that are on your dashboard and many more are available to see by interrogating the cars computer.

Your Winnebago Fuse has a OBD-II interface located below the steering wheel on the left.  It is accessed by opening a panel that exposes the interface.

Ford Transit OBDII Interface


I purchased a diagnostics adapter so I could see what was going on.  If the check engine light ever comes on I thought it would be nice to be able to see the error as opposed to just taking it on faith what the repair people told me.  

The adapter I purchased was a KOBRA Wireless OBD2 Car Code Reader Scan Tool OBD Scanner.  This one works with IOS and Android devices.   In the past, these devices were expensive pieces of test equipment.  They are now, very inexpensive.   Some cost as little at $10.00.

Kobra OBDII


To do anything with the device you need some software as well.  I purchased "Dash Command". another $10.00 purchase.    There is free software, but after trying several, I decided to buy this app since it got high reviews.   It was the right decision.

How do you get it started?  With an iPhone/IOS device you connect to the Kobra scanner using WiFi.  Open your wifi settings and connect to the WIFI_ODBII SSID.

IOS WiFi

Then you start the software on the iPhone.   I had to input some settings for the Transit 350HD the first time.   Every other time, you just pressed go.  You start to app and then tell it to connect to the scanner.   There are a huge number of screens to get information from and they are customizable.   You can even download templates others have created.  I have stuck with the default screens.

Dash Command screenshot 1Dash Command screenshot 2Dash Command screenshot 3Dash Command screenshot 4

Dash Command screenshot 5Dash Command screenshot 6

I was very interested in several things.   For example, I can now get an idea on the Fuses current fuel utilization.  I really wanted to know how many gallons/hour the Fuse uses when at idle.  I now know.  0.3 gph.

Another question I wanted to know was if I had any diagnostic logs.  The important ones cause a check engine light.  I have not had this happen, but some of the minor ones are recorded so the Ford techs can see if anything out of the ordinary has happened since they were last cleared.  I looked and there were none.  Oh, and if you need to, you can clear the codes as well.

Dash Command screenshot - Logs

I purchased this for the Fuse, but I can use it on any car built since 1996.  For a total investment $10.00-$30.00 it is a great investment for those who are interested in some of the details of the automotive portion of the Fuse.


Thursday, June 1, 2017

Mods to Make the Air Conditioner Quieter


The Airexcel Mach 10 air conditioner in the Fuse is noisy.   It is mostly noisy since our motorhome is small and there is no way to escape being right next to it.    It would be nice to make the air conditioner quieter.

Coleman  Mach 10 Air Conditioner


For a while I have tried to understand what all the noise was from.  Was it from the air conditioner compressor?   Was it from the fan?   Was it from the air rushing around?

I spent a little time looking into all of these.   And it seemed most of the noise was just from the air rushing out.

I did talk to Airexcel (Coleman) to see what hints they could give.    In some older air conditioners there was lots of noise coming from the compressor or from the compressor fan.   I was told with these units they were as noisy outside as inside.   Our Fuses do not have that problem since they are newer than these problems.   They sold a hush kit with a different fan for these.

In some cases, over tightening the air conditioner screws to the RV would cause excessive noise.  The vibrations from the A/C would travel throughout,  creating noise.    Not a problem I was having, but a good tip.

The A/C air handling fan could be another source.  I took the cover off and it seemed quiet enough.  No noise coming from a noisy fan.   It seemed as if most of the noise was coming from just the air rushing out and moving through the duct and air vents.

At least the problem is identified.  Air moving makes noise and we have lots of it.  The Mach 10 is moving air at the rate of 310 cubic feet per minute.  Not a small amount.

In the Facebook group (Winnebago Fuse Owners) we have been discussing this for a while.  The key to any air conditioning mod is to not restrict the airflow.  This will cause the air conditioner to freeze up.  I tried each independently.

Two Mods were discussed that appeared promising.

Mod 1 - Sharon Berg in the Facebook Group suggested using a Duck Brand 1286294 Air Conditioner Foam Insulating Panel and place it in the bottom of the register. This foam panel has ripples cut into it.   This is placed on top of the foam that is already in the register.   You have to do some trimming to cut out voids for the controls and the bottom air outlets if you have a Deluxe ChillGrille.

Foam Insulating Panel


This was pretty easy to do and inexpensive (less than $10.00).   I measured a sound difference of .5db at the head of the passenger bed and at the front of the love seat.

Mod 2 - Kevin Under posted a second option and wrote it up in the Facebook.  Find the file here.  The method is to use 1/8 " foam pipe insulation tape and line the inside with the tape.   I did this and saw a decrease of 2db.  From 70 to 68 decibels measured at the head of the bed.  At a subjective level, I can now watch TV at level 68 down from level 75.   (It was at level 95 before I replaced the register with the ChillGrille Deluxe.)

Foam pipe insulation 1/8" x 2"


Foam pipe insulation method in ductfoam pipe insulation in register


I believe that the majority of the help came from the tape in the duct than from the fan to the register. I have no measurements (I forgot), but I had tried a piece of thicker foam earlier in the duct directly below the fan and saw a 1 db drop using the phone app.

Foam in A/C duct