Showing posts with label Mods. Show all posts

Monday, September 3, 2018

Gas Strut for the Under Bed Storage

Fuse Gas Strut Storage Project


If you have a Fuse 23a one of the great things winnebago did was create a large amount of storage under the foot of the driver's side bed.   It is a real hidden gem that the sales people often don't seem to know about.  We keep our extra water, sodas, toilet paper, anything we only have to get to ever couple of days.

There is one problem with it.  You have to hold open the lid to get things in and out.  Winnebago did not put anything in place to allow you to hold it open.  It is also pretty heavy especially if you have your bedding in place.

We keep our rear beds made up as beds and it requires some muscles to open it with the bedding on top.  For Sonya and myself it turns into a 2 person job.  One person opening it and the other dealing with the stuff.

Ron Jansen came up with a great idea.  Add a gas strut to the system to help open it and hold it open once you get it upright.  So I decided to add this mod to the Beagle Bus.

The parts I used:
Fuse Strut mod parts


Under bed storage compartment.

This is the before picture.  I had to take off the bedding and the mattress to get started.  As you can see we have several very important things stored in the compartment.

Strut End


Step 1 - Prepare the Struts.  The struts are connected using the ball stud brackets.  Then get the hole in the strut to go over the ball you have to slide up a small clip on each end of the strut.  I needed to use a small screwdriver to get it to move.

Flat ball bracketL bracket attachment


Step 2 -  Attach the flat ball bracket.  This is an easy step.  We reuse one of the screws from the L-bracket in the corner of the bed.  I chose the 3rd one up from the bottom.   Unscrew the screw and then screw it back in with the flat bracket in place.  It is not a perfect fit, but pretty close.  Best of all no drilling.

Angled Ball bracketAttached angled ball stud bracket


Step 3 - Attach the angles ball stud bracket -  Now we need to attach the upper bracket.  I slid the gas treat into place and just hand fit the part making sure it was not at an angle.  Once I was happy I marked where the middle hole needed to be.  I used the hand drill to make a pilot hole so I would not split any wood and it would be easier to screw it down.  When I got the first screw in I made sure it worked the way I wanted it to. 

In a rare occurrence, I got had it lined up right the first time.  It would not have mattered if I had it in the wrong place.  I would have just moved it.  Any mistaken holes would have been hidden.  I then added the remaining 2 screws to make it permanent installation.

Gas strut for storage on the Fuse


Step 4 - I installed the gas strut.  This was very easy since I had it hand fit already.  All I needed to do was slide the clips back down so the strut would not fall off the back studs.  The project was complete.

Now getting stuff in and out of the underbid storage is a one person job.  No effort required.

Other folks who have done this mod have suggested using a 60lbs strut since the 30lbs strut does not hold the top open with bedding on top.  My experience is that 30lbs will allow you to hold the lid open with your pinky and makes opening it super easy.  Making the change to 60lbs would be super easy but I am staying with 30lbs for the moment.

Effort required - Low
Total time - 15-30 minutes
Cost of the parts - $30.00

Thursday, January 18, 2018

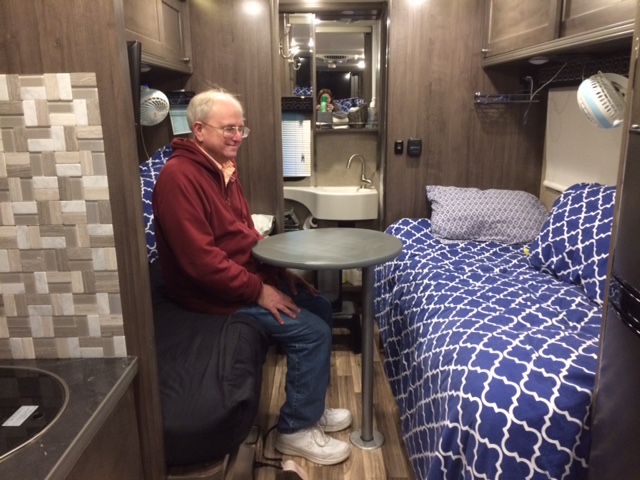
My New Table


Dons Fuse Table


I have a Fuse 23A and I keep looking for the right replacement for the table.    Don't get me wrong, the tables that Winnebago supplies are super sturdy. They are actually made to sleep on as part of the Flex-bed solution.  They are never going to break.

But they are big, unwieldy, and heavy.   Not the easiest thing to put up and take down.  And getting around the table when set up to get back and forth to the bathroom is problematic.

I have the Porta-Legs Solution.   I have tried using the Foot Stool.  We still have and use both of these, but they are just not a perfect solution when we stop for lunch at a rest stop.

Most ideas I point out are never mine.  I am just not that creative.  Several months ago in one of the Winnebago groups I saw a person had built  a tabletop out of a wine barrel lid.   I thought that was a great idea.  Then my hopes were dashed when I saw the price for the lid alone was $150.00.   Though very pretty, it was not in the right price range. But it got me to thinking.

I wanted to solve several problems.

  • The current tabletop is too heavy.  Designed to hold the weight of a human it was way overbuilt just to put a couple of plates and glasses on.   I want light.
  • I wanted to make it easy to get around.  The square tabletop gets in the way of my stomach when I try and scoot by.  If it was round, it would not get in the way so much
  • I wanted to be able to move it out of aisle as we were getting ready to sit down.  Winnebago had done this on the small table by offsetting the pole adapter so I would take their idea as well.

Dons Fuse Table bottom

So I started looking for a top.  Not being a master craftsman I needed something mostly finished and I found it.   Home Depot had 1x24" edge glued round blanks for  $11.00.  I wish it was a harder wood than pine but it should work.  Definitely in the budget.  Strong enough to hold dinner.  Not too big or too small.  And most importantly, if it did not work out, it would not be much of a loss.

Dons Fuse Table Base


I also needed a base for the table.  Amazon comes through again.  I ordered  a SurFit High Polymer Table Base.   Why polymer rather than aluminum?  It got better ratings and I was somewhat obsessed by weight.

Now on to how I built it.   First thing I did was to decide which face of the wood was the nicest.  Once I did that  I sanded it with a fine sandpaper.  The blank was already sanded very smooth so it just needed a little touchup.   Pretty easy task where the hard part was cleaning up the saw dust.

Dons Fuse Table Base Distance From Edge


Then I attached the base.  Like I said above I wanted it offset so I placed it a couple of inches from the edge.   I marked where the holes should be by placing the base on the wood round and marking where the holes were. I used a drill to create some pilot holes.  The secret here is to put a piece of tape a half inch from the tip of the drill bit so you do not drill too deep and punch a hole through the top.  (I have learned this lesson in the past when I was in a hurry).   I secured it with some screws (#8 x 3/4") and I had a tabletop.

Dons Fuse Table centered


Now for staining it and finishing it with some polyurethane. Not my strongest suite but it came out fine.  A pro could have done much better but it looks fine.  Sonya got to pick the color so you can ask her why so grey (consultations over the color probably was the most difficult part of this project.  (Sonya's note:  Some folks don't believe in blending colors so flat grey is what we ended up with.)).

Dons Fuse Table Aisle

Dons Fuse Table Sitting twistedDons Fuse Table Sitting Centered


It works well.   It can twist out of the aisle and you can walk by.   Twisted into the center it is easy to sit at.

So for a $20.00 project we now have a better tabletop.  We will leave one of the original tabletops at the house on our next trip and store the round one in its place.  We will try it out for a while and see how well it works.   It is definitely lighter, easier to set up/take down and much more comfortable to get around.   And if I find something better on our travels, it won't hurt to replace it.


Wednesday, November 29, 2017

My Sumo Springs


Sumo Springs SSR 121-54


I recently had SuperSprings Sumo Springs installed on my 2017 Winnebago Fuse 23a.  It has been so far one of the best upgrades to the Fuse I have had done.  I recommend it to everyone.

Lets start at the beginning.  I have scraped the rear of my Fuse once.  This was going from a driveway on to a crowned road.  I have scraped the stairs once.  This was going over a speed bump when I bounced because I was going a little faster going out than when I was going in.  In both cases  I was not being careful but in each case if I had had 1/4" more clearance or  less bounce I would not have had a problem.

So what to do.  I had read on several other sites about Sumo Springs and I have talked about them here as an option to raise the Fuse.   They were recommended unofficially by the Winnebago engineering team.  It appeared with a small amount of modification to the unit you would get a large payoff.  So I decided to give it a shot.

I had the local RV dealer do it. It appeared I could have done it if I had the right jacks and stands but  I just did not have the time and had been putting it of for a while.   I should have brought it to a local suspension shop to do the work. I could have saved a good amount of money (30%). But I had the Fuse in the shop for a recall and time is what I am short supply of so I just said make it happen.


Rear bumper before SumoSprings     Rear bumper - after SumoSprings

So before I had the Sumo installed the fuse stood at 12" at the rear bumper.    After they were installed it was at 13.5".  An increase of an inch and a half.   Good.

Step before SumoSprings Step after SumoSprings


Before I had the Sumo installed the stairs on the fuse were just under 7.5".  After they were just over 8".  An increase of a little over 1/2 inch.  Again - A good change that would have saved me in the past

So the real proof is in the pudding.  Did doing this modification change how well the Fuse rides and  drives?   It did and it did for the better.   I have always thought that the Fuse rode like a nice SUV.  Now it rides like a luxury car.   All of the little bumps and cracks in the road have disappeared.  And so did the noise and rattles in the Fuse when you went over them.  I have never noticed any real sway in the Fuse but I could tell on our first little drive (650 miles) that that there was even less now.  It now rides like a Cadillac.

I even rode on the back bed for a little bit.  Before the Sumo Springs it was pretty bumpy riding back there.  Way more noticeable than in the front.  Now with the Sumo Springs installed the ride has calmed way down in back.

How do the Sumos do this.  I posted an earlier article and the Sumo Springs act like airbags would in a traditional motor home.  You can't adjust them but they absorb the bumps and provide a better foundation for the coach to ride on.

The next question is did I do anything to the front suspension?  The Sumo folks sell something for the front springs as well.  I did not do anything to the front.  The Travato group members who have done this don't seem to think that the Sumo product for the front do much or anything to help in an RV configuration.  They are probably right since all of our weight is in the rear.

Another question is did it change the level and do I need blocks now?  The answer is no.  The Fuse seems to be as level as it always has been.  I don't have exact enough equipment but in my driveway and a the campsite we stayed at everything was still in the center of the bubble level.  The extra inch over the length of the vehicle did not seem to throw anything off much.

What about the warrantee?  Per Ford it will not void the warrantee if it did not cause the problem.

From a overall perspective, just the improvement in the ride would justify adding the Sumos to me.  If you have a 17.5 or 18 you already have some additional clearance but you will get a little more.  Not as much as if you added an additional leaf spring but every little bit helps.

From a technical perspective the shop replaced the original bump stops with Sumo Spring bump stops model SSR-121-54.   They used a 1" spacer .

Last question -  How much?  This seems to always come up.   You can buy the SumoSprings on sale for as little as $223 but they retail for around $300.   Installation takes 1-2 hours.

Don Moody did a great video for anyone who want to do it themselves or just see what this involves:


Friday, November 10, 2017

Cabin Door Noise fix from Winnebago


One of the common problems with the Fuse is excessive noise coming from the cabin door when driving at highway speeds.

On my 2017, the wind noise was on our punch list before we picked it up.  The dealer adjusted the door and added some weather stripping and that helped - but it was still there.  I added some additional weatherstripping and filled some weep holes in the stairwell and would only get the noise above 65mph and even then it was not too bad.

Then during the Spring Get Together, the Winnebago engineer told us that they had found some issues with the airflow around the door causing noise at the door hinges.

This is an excerpt from the Spring 2017 Get Together notes:
Side door noise -  There are two door vendors that have been used.  Atwood is the original door and Lippert is the current door.  The door has been used on other units with no noise issues but the thought is that the placement of the awning arm on the other unit and/or the curved front of the Fuse is making the air flow different and it is hitting the hinges. Winnebago is working on a hinge cover that may solve this issue.  (Whether this solution can be retrofit is still unknown. One issue being the aesthetics of the graphics and the other being the change in door heights.)

Well Winnebago now has their fix.

Wind Deflector diagram

Winnebago has come out with a Wind Deflector Screw Cover.  Part number 321703-01-01A.  311996-01-02A. Part name is: Wind Deflector Screw Cover. Looking at the Winnebago Parts lists it looks like it started being installed on new units in late August 2017.   


Fuse Wind Deflector - thanks to the Netzleys


I am not sure if it will work on the older 2017s with the Atwood door, but if you have a 2017.5 or better there is now a solution.   Reports from the Netzleys who had them installed at the factory are very positive.
The wind deflector they installed for us at the factory made a BIG difference. We can now hear the radio, cell phone and carry on a conversation! We'll post a picture and more information in the next day or so. - Sharon Netzley

Sunday, November 5, 2017

Fall 2017 Get Together in the Rockies


We held our Fall Get Together - the "Get Together in the Rockies" September 29 to October 1 in Fort Collins, Colorado.    It was great.

Lots of Winnebago FusesWinnebago Fuses in a row


We had 14 Fuses and 1 wanna-be (the new term is "gonna-be") come to the event.   The Winnebago Engineer canceled at the last moment with an emergency, so we had to do the tech talk on our own.  There were enough experts in the group to answer most of the questions.

The Fuse Group from Ft. Collins


So what did we do.   On Friday night we had a pot luck.   And there was some mighty fine eating.  I am not sure it was the altitude or the cool mountain air, but everything was delicious.

The Fuse cup


The souvenir from the event was a little different this time.  We did not do wine glasses.  A comment last time was they were a little fragile for camping so this time we went with plastic cups.  They won't break and being lighter they might help with the gas milage.    If you want one and are traveling through Tallahassee, let me know.

Saturday morning we had the Tech discussion.  We will go into that a little further down the page.

We had leftovers for the group for lunch and then after lunch we toured the coaches.

Fuse PartyFuse Food


Saturday evening we had our Pizza party.  That was some good pizza.

Then unfortunately it was over and we all went our separate ways.  It was great to get and meet everyone.

=======================
Ok, so now what you were waiting for.  How did the tech talk go?

Before the meeting I was able to talk to Winnebago about what they are thinking about future Fuses.  I think we all like to know what Winnebago is thinking about.   A lot of what they are doing is happening on all of their small motorhomes so the real question is when it will happen in the Fuse.   Keep on the lookout for this as the 2018.5 and 2019 models come out.

Remember these are futures and subject to all sorts of factors, so there are no guarantees.  These may turn out to be standard features or options or not make it outside the lab.

One of the new items Winnebago is looking at for all of their motorhomes is using compressor refrigerator.s  For those that don't know, a compressor refrigerator is like the one in your house.  Runs on electricity only (DC) but does not care  if the motorhome is level or not.  Cools much faster but uses electricity.  The first compressor refrigerators in small Winnebago motorhomes were released on the models announced earlier this month.    (Look at the Norcold compressor refrigerator in the new Navion)

To make the compressor refrigerator work out there is discussion about making the batteries bigger.  Group 31 as opposed to Group 24.  And if they can find the space they might be able to squeeze in a third battery to add capacity.

They also want to make solar standard.  Not just with 1 solar panel but with 2 100w panels.  This will help with the extra electrical needs of the compressor refrigerator.

A lot of the feedback they are getting from potential buyers revolves around people wanting an Inverter.  They are going to try and get one in the Fuse for us.

Ford is making the drivers side seat swivel in the 2019 Transit (remember that the Fuse is a transit underneath). It should be available around the August, 2018 timeframe.  Once they are available they they will use this chassis in the Fuse.  The key to this is Ford will be moving the parking break from between the drivers seat and passenger to somewhere else (possibly electronic).  Ford may also have a different solution on the passenger side.

And as far as being a low rider.  Winnebago continues to look for ways to raise the rear.    The engineering team has taken our feedback very seriously on this issue.   One thing they are exploring is angling off the last couple of feet in the back.  It is going to require them to move some things around in the rear and they think they can without decreasing any storage or having to make major design changes.  They think that there is a good possibility that they can rake the last couple of feet in the rear and add a few inches of clearance.

The group also had some questions for Winnebago.  Since they could not make it I took them down and Winnebago said they would answer them for us.    Here is the list and the answers are underlined:

1). How many Fuses are on the road:  Over 600 

2) Why does the rear tv sound not come through the bed speakers on the T:  The rear speakers are connected to the radio/DVD player. The radio can only play audio from one TV.

3)  The consensus is that we really need a better way to access the batteries.  Is Winnebago looking at putting them on a sliding tray or something.  The current setup is really bad for checking water levels. We will evaluate.

4). Has there been some thought to moving the generator breaker to somewhere easier to access on the A.   Crawling under the unit to reset the breaker is problematic:  At this time we do not have a solution. We cannot move the breaker.

5) Have you thought of making the rear window the emergency exit window on both units: We would need to reduce the width and height significantly to clear the ladder and customer bicycles installed on the bike rack.

6) The wheel simulators and nuts seem to be a problem.  The nuts have gotten lost on the road and they cause issues accessing the tire stems.  People are replacing the stems or having to take off the simulators to add/check air pressure:  We would like some clarification on this issue. Do you think the 2 nuts that hold the liners on are not tight to begin with or are the nuts not staying tight? We do provide extensions for the inside duals which should be accessible. The outside dual require a dual head angled air chuck to fill or check tire pressure.  (I sent them information from the group so they could understand the issues)

7) What about factory TPMS from Ford: Not available from Ford on the Transit cutaway chassis.

8) The springs are fully loaded on most of the Units.   We measured all of the units.  Clearances range from 11-14-16 inches depending on year and what suspension mods have been made. We had several (including an 18) with additional leaf springs added and one with Sumos added:  We have evaluated the Sumo Super Springs. The springs raised the rear of the coach about 2 1/2´” At this time the testing required by Ford for Winnebago to install these springs has not been done by Sumo. They are available for a customer to add.

9) The rear bumper is attached to the plywood rear wall.   Lots of damage is caused when bumped like a bumper:  We will look into this issue.

10) What about replacing the bathroom door in the T with an accordion door.  One person did this and now several others will as well:  We had an accordion door on a rear bath in a past floorplan. Many complaints, we won’t do this change.

11) Have you changed out the drawer latches with heaver duty ones.  There seems to be a mixture depending on what unit is looked at.  We all agree we need the HD latches. We spec out a 10lb latch for large drawers and forward facing drawers.

12). More questions about how to make the Front table on the A model useful with the slide in. We are evaluating this suggestion.

13) Can you change the latch on the Front TV on the A so you can angle it to the couch as opposed to the door. This suggestion is also being evaluated.

14). Richard K.  Has reoriented the seating on his T to open up the front area much more than the default layout.  He posted some pictures you all should look at.   This seemed to be the hit of the show. I couldn’t find the photos. Could you send?  (I sent Richards article in response to this)

15). Still issues with Quality control.   Rust spots in the sink are common:  This issue should go through warranty. I will ask our warranty dept. for the sink warranty claims.

16) The Bents are having problems getting a new bathroom sink (cracked)  and trim for the pop up counter extension from their dealer.  The dealer is saying it is backordered from Winnebago.  Are repair parts backordered? We had a shortage of parts for production. We no longer have a shortage.

17) You would sell a lot of Fuse branded gear if it was available. I will pass this request on to the Marketing dept.

Then we went around the room for Q&A.  We had lots of questions asked and luckily we had a large number of experienced Fuse owners to answer them.   Lots of talk about raising the fuse.  Lots of hints and advice on storage and places to shop.   Just like the facebook group but live and in person.   It really was great.  I stopped taking notes because I became too interested in the discussion.  

After this and lunch we went and looked at everyones Fuses and the mods they had done.

Fuse Smart Car
Smart Car Tow Setup
Fuse 23T storage
23T storage organization
Fuse Slide Out
Slide out decoration

Fuse wheel Stems
Berg Stem Extenders

Fuse HD sewer hose
Wastemaster Premium Sewer hose


The big hit of the walk around was Richards mods to his 23T.  He has rearranged the bench seat to open up the front.  My photos did not do it justice so you can read his article here.

I also measured various Fuses.


Fuse HeightFuse HeightFuse Height


Wednesday, November 1, 2017

What are Sumo Springs


Here is an interesting video about Sumo Springs and what they are.     Sumo Springs are from a company called SuperSprings.   This video talks about several of their products so you can see how and why they developed Sumos.

Sumos are just one of the options to increase the rear height to avoid scraping the rear.  Adding additional leaf springs and adding rollers are other options people have come up with to protect the rear end.

Based on conversations with others, the Sumos should add an 1.5 inches of additional clearance.    The model number for the Heavy Duty SumoSprings for the Fuse is SSR-121-54.   List price is approximately $300 though I have seen them as low as $230.  The costs for a set of HD Sumos and have them installed should be less than $500 including a hour or so of labor.  It is a fairly easy modification and those with access to heavy duty jacks and jack stands are able to do it themselves.

If you do not care about the whole SuperSprings line and only want to listen about Sumo Springs, jump to 6:40 in the video.

https://www.youtube.com/watch?v=v6icTXCY25w

Sunday, October 29, 2017

Generator Noise


I took some time a while back to see what could be done to help quiet the generator.   Most of the noise on mine is mechanical noise from the unit itself.  Remember that I have a Fuse 23A so the generator is mounted underneath, centered at roughly the head of the beds.

I even asked Onan about what could be done. They were up front and said not much since the QG2500 is just noisy.   They said that the best that could be done was to put it in a soundproof box.  That won't happen on the Fuse since there is not an easy way to do it and keep airflow.

QG2500 - copyright Onan

But I did take a look.   Tried a couple of things and found some areas I need to give some more thought to.   I tried to find places where there was metal on metal contact.  I also looked for places where sound could reflect and reverberate.

When I went underneath and looked around I saw a couple of things that were interesting:
  • The generator is in its container with some soundproofing inside, but mounted to the motorhome without any isolation pads that I could see.
  • The cooling appears to be from the front panel and blows through and straight down coming out near where the exhaust comes out.  A huge amount of noise comes with this.  I am pretty sure the noise is bouncing back up.  
    QG2500 Air flow
  • Above the generator is a metal plate.   There is a 6-8 inch air gap between the top of the generator and this plate.
  • To the passenger side is a metal panel.  This appears to be the rear of the storage compartment.  There is an I beam above this space.
  • To the rear (or the generators front) is the black tank
  • There is no undercoating apparent.
  • Where the exhaust comes through the generator mount is very tight.  On my unit the exhaust and exhaust clamp touches the mount.   This is an issue.
    Exhaust routing
So I took some time and tried to attenuate the sound.   I was concerned about affecting air flow, so I was rather careful.  I tried a couple of things:
  • I applied some 80 mil Dynamat (actually Noico Sound deadening mat) to some of the surfaces around the generator.
    • I put some on the metal pan above the generator.   This appears to be part of the subfloor so doing anything here could quiet sounds getting into the living space.  
      Dynamat above Generator
    • I put some on the metal that makes the back of the lower passenger storage compartment. from the generator.  It was a large flat surface and had some vibration.  In this case there was still vibration afterward.  This area is just not stiff enough not to move.  Some foam is needed behind the metal inside the storage compartment.    
      Dynamat
    • I put some on the black tank surfaces facing the generator.  
    • I put some on the surface of the I beam, but not in the open area. 
    • I used around 4 sq. ft of the material.  It did seem to make a difference.  Not a difference in how loud, but it made the noise more lower note.
  • I took a good look at the exhaust system.  
    • I followed the heat shield to make sure it was not making contact anywhere (it was not).
    • I looked at the area where the exhaust passed through the generator mount.   This is a huge area for improvement.  The exhaust pipe touches the mount and the pipe clamp touches the generator mount at this point.
    • I put a little exhaust wrap (HM&FC Titanium Exhaust Wrap) in that area to try and get rid of any metal on metal contact.  This helped somewhat.   I need to think about doing some more here.   The exhaust is resting on the mount and I could not get anything under the exhaust pipe.   
Metat on metal contact


So what were the results?   It helped a little but not significantly.   But I do have a couple of more things to look at:

    • Any way to isolate the exhaust from the generator mount.  
    • Move the exhaust clamp next to the generator mount out slightly away from the mount.  Maybe 1/16 -1/8 inch.
    • Foam as opposed to Dynamat in the I-beam void
    • Foam on the back of the lower storage area.  This backs up to the generator space.  The panel still sounds like it reverberates noise from the generator since it is not very stiff. 

Wednesday, September 27, 2017

Front Bench Mod Fuse 23T

Editors note:  Richard Kozloski has a 2017 Winnebago Fuse 23T and is a member of the Facebook group.    Please comment in the Facebook Winnebago Owners Group so Richard can respond to everyone directly:

We have a guest post from the very creative Richard Kozloski.   A link to the entire article with all of the photos can be downloaded  at:    https://drive.google.com/open?id=0By_GWZtlcHblRkZnR29iRG9UU2c


WARNING!
This document contains explicit photographs of RV carnage. An innocent 2017.0 Fuse 23T was put at extreme risk and could have been disfigured for life. The persons providing this document take no responsibility for your outcome if you should choose to proceed. Continue at your own risk.
When you read this article you might be asking yourself “Why did they buy a Fuse 23T if they hate the setup so much they are willing to hack it all to pieces?”

First let me say that we love our Fuse. But it was made for the masses and we have a few things that we think need a “little tweaking” to suit our needs. This is one of our many upgrades to make “Waldo” our own and fix things we think could have been done better.

The Conspiracy
During our 6 week 9000+ mile to the great Northeast the major complaint we had about our Fuse was the tight, inefficient layout of the front dining area. It was extremely uncomfortable seating and very awkward to eat and/or play games at the table as installed by the factory.

When one person sat on the passenger bench, facing forward, the second person either had to sit very close on the same bench or the drivers side bench had to be pulled out part way so the second person could sit close enough to eat/play facing the short side of the table.

Even when not in use the fixed position of the table blocks a large portion of the useful area making the space feel cramped. Because of the fixed table and bench taking up most of the front area the factory layout also only provides a narrow walkway from the drivers compartment to the center and rear of the coach.

With lots of time on my hands, and an overactive engineers imagination, I began thinking about how to make this area more usable. I finally settled on a plan to rotate the passengers bench seat 90 degrees and position it flush with the outside wall under the window. The table would be removed from the wall mount position and modified so that it could be placed in multiple positions either across the new open area, or in front of either bench. (More on this later.)

The Plot Thickens
With the design firmly in mind all that was left was to get permission from the Chief Financial Officer (my wife). I convinced her that I could disassemble the current setup and rotate the bench so that she could get an idea of what it would look like without doing anything that couldn’t be reversed. This would also allow me to determine what problems would have to be overcome, if any.

With the promise that it could be returned to factory condition I was given permission to proceed. When she saw the improvement in space utilization she gave the go ahead and the rest follows.
page1image25984 page1image26144
The Start
Looking down into the area under the bench shows the three major problems of the project.
The first is obvious and the easiest fixed. The water heater is located under the seat and moving it was totally out of the question. Measurements showed that there would be almost exactly he same space around the heater when the bench was rotated.

The second was the bolts for the seat belts and the baby seat retainer. It would be necessary to crawl under the RV to remove them, or so I thought. (This turned out to be impossible and they would have to be cut off from the inside.)

The third problem turned out to be the most difficult to solve. When the “little piece of wood” that runs across the floor by the seat belts was removed it revealed a “large hole” in the middle of the compartment. When this is inside the compartment under the bench it’s no big deal. However, when the bench is rotated it ends up “out in the open” and will need to be plugged and the flooring patched.
page2image10936  
Fixing the Major Problem
I scratched my head for a couple of hours trying to come up with a plan to fix this impediment to the project. This was the only thing I could see that would keep me from my goal. I didn’t want to disconnect the wires going to the water heater if possible. Crawling under the rig I could not see any easy way to reroute these wires. I was about to give up and put everything back to factory condition.

That is when I noticed that Winnebago had tunneled out the foam between the subfloor and the metal outside plate of the floor for the water lines going to the water heater.
I could cut a new opening for the wires under the new seat location. I could then remove a piece of flooring between the two holes, cut out the foam and stuff the wires inside the slot and replace the floor over them. This could be done even if I had to go back because it would be completely under the bench in the factory setup.

It was necessary to cut the linoleum flooring and peel it back carefully so it would go back together and not be noticeable. (This was necessary as I could not make arrangements to get a piece of flooring scrap so that it could be blended in better.)
page3image12640 
Reassembling the box
I decided to put the factory bench wall back into its original position to aid in installing the “box” components of the bench. This would align everything to help get everything squared. The plan was to have the wall at the entry in the same location. All the original components were use unmodified. The center dividing wall as installed at the same location to keep the water heater isolated and to allow the reuse of the two top seat planks. The metal channel for the plastic corner molding on the short wall was removed and reinstalled on the opposite end. The same for the channel strip on the long wall. The plastic corn was then installed. (Use a good carpenters square and take lots of measurements to get everything plumb.)

This is what the setup looks like with the bench seats installed for testing. At this point the process could still be reversed back to the factory setup as the bench back wall has not yet been cut shorter. You can also see the hole in the floor for the wires after modification. It has not been plugged and the floor hasn’t been parched yet.
page4image10976  
To Infinity and Beyond (sorry Buzz)
At this point the decision has been made to make this permanent. The bench back wall is cut down and converted to the bench end wall.

Now what remains is the removal of the seat belt and baby seat bolts. These were left until last in hope of being able to access and remove them from under the RV. Unfortunately I could not get access to the bolts as they were behind numerous heat shield items. It was decided to cut them off flush with the floor. To aid this the linoleum was cut carefully along plank lines and peeled back so a Dremel could be used to cut the bolts. (With the luxury of hindsight i would have cut the bolts off before I reassembled the box making it easier to patch the flooring,) Material for patching the floor was cut from under the bench in front of the water heater.
page5image8768   
The Result
This is what it finally looks like. The result is an unobstructed open area that is approximately 3 x 4 ft. When the table is not out it feels open and airy and a lot bigger than it really is. Access from the front seats to the rear is now easier as there is not a fixed table blocking your path. We are temporarily using a drop leg table that we purchased from Camping World years ago and have been using now in our last three RV’s. It stores alongside the newly rotated bench just behind the passengers seat. When fully extended it is 42 x 24 inches. The same surface area as the factory table. It can be used with both leafs up across the opening between the seats or in front of one of them. Same with one leaf up. This area also allows a standard 34 x 34 inch folding card table to be used for four person games/meals.
page6image9208  
What would I change/do different

  • I would get a large enough chunk of linoleum from Winnebago to cut a one piece replacement. I would cut the seat belt bolts flush with the floor first.
  • I would come up with a way to plug all the holes the table left in the walls behind the cushions. And the most important ...
  • I would have Winnebago build it this way as an option. Richard “Ski” Kozloski

page7image5376