Sunday, April 9, 2017

A New Drawer Latch


Winnebago Fuse Drawer

One of the few warranty issues I have had with my Fuse was the rear drivers side drawer under the bed opening when I make a turn.  When we brought in the Fuse for some warranty work this was on the list.  They adjusted it and that seemed to fix it.  Seemed being the word.

After a while I noticed it started opening again.  Well, not all the time.  Only when there was a lot of stuff in it.  If there were only a couple of things in the drawer,  it would stay closed.

I guess inertia wins.  With more mass in the drawer, there was more pressure on the drawer and the latch would not hold it.  It made sense.

Winnebago Fuse Drawer latchWinnebago Fuse Drawer latch


So how to fix it?  I bought some new latches.   The part I bought from Amazon was a Southco Inc SC-4320 Side-Mount Grabber Catch 10 Lbs. Pull Force,    They did NOT include screws but the old screws were a perfect fit.  The original part on my drawer had a 5 lbs pull force so this one with 10 lbs of pull force should have double the holding power.

Winnebago Fuse Drawer Latch old and new
New Latch set - Old Latch set

The new latch (upper part) was identical match externally to the old part.   The holes were in the same spots and they were the same size.  The new hook was longer that the old one so I had to make a new hole in the inside of the drawer.

Winnebago Fuse Drawer latch hooks
Old hook on top - New hook on bottom


The steps I followed were fairly simple.  You do need a short screwdriver or an offset screwdriver to change out this part.  There is not much vertical space to work in.

Winnebago Fuse Drawer latch set


  1. I unscrewed the hook part from the drawer.  I made sure to keep track of the screws since I would need them for the new part.
  2. I screwed in the new hook.  I reused the screw hole on the short side and had to create a new hole on the longer side.  The wood is very hard, so a drilled a small pilot hole maybe a 1/8 of an inch deep into the drawer face.  
  3. I unscrewed the latch from above the drawer.  It is held by 2 screws.
  4. I screwed in the new latch.  No new holes needed since the holes are in the same place.  On my unit, Winnebago had the screws going through the round holes on the catch as opposed to the oblong openings.  I  did the same.  I think they should have been using the oblong opening on the latch so there was some adjustment.  If I had done this I would have had to make new holes in the wood.  Where they were at they were fine.
  5. Screwing in the new latch was the hardest part.  You can't see very well and I had to find the existing holes by touch.  Not hard, but it took most of the time in the project.  If I was handy, it would probably not be a big deal.

The task took 15 minutes.  It would have probably taken 5 if the space was not so tight and I was handier.

The new latch setup holds the drawer much much tighter.  It requires a firm pull to open. 

I did try them both when they were not connected to the drawer.  The original catch was pretty easy to come apart.  An easy pull.   The new one required real strength.  I got concerned that I was going to need a screwdriver to get them apart, but did eventually get it.  Once on, the drawer leverage helps.


Winnebago Fuse Drawer latch closed

Wednesday, April 5, 2017

Lifting the Fuse - Sumo Spring Option

Editors note:  This is a post from Arlene Cassels who has a 2017 Winnebago Fuse and is a member of the Facebook group.   She decided to lift her Fuse using Sumo Springs and was nice enough to share her experience.  This was already posted in the Facebook group.  Please comment in the Facebook Winnebago Owners Group so Arlene can respond to everyone directly:

Chapter 3, and hopefully our last chapter on raising our rear end on our 2016 Fuse with a T35 Chassis.  Took it in to Straight Line Suspension on Main in Mesa, AZ.  They looked at it and said the Sumo Springs would work.

Ordered them and installed.  This raised our rear end from 26 1/8" to 28". We can see the difference.

The frame used to ride low over the tires. Now rides just above.

Winnebago Fuse Sumo Springs


They used Part No. SSR-121-54, if that will help.

Incidently, they said with the previous height, when we hit any bump, our left tire was hitting the fenderwell - not good! See pictures. Hopefully this will help some other owners.

Winnebago Fuse Tire Scrape


Sunday, April 2, 2017

Winnebago Fuse Owners Facebook Statistics

I changed the Facebook group from open to closed.   All this means is that you have to join the group to read the contents.  

This seems to be a good time to provide a status report on the group.  So to see where are and where we go from here.  It is time to get some statistics.

The "Winnebago Fuse Owners" Facebook group was started on 4/19/2016 and we changed it from open to closed on 4/2/2017.  The this around 11 months in operation.

We have had:
      767 posts
      126 authors
      154 commentators
      216 reactors
   3,000+ reactions
       28 shares
   4,200 comments

The two most commented posts both had 34 comments:
   The first one was by Lynn Hawkins and her meeting with the winnebago product team
   The second one was Patsy Stair and the problems she had with her Fuse order

And just so you get a since of activity in the group, a tool from sociograph.io provided this graph.  It gives a representation of daily activity in the group

Winnebago Fuse Owners Group Statistics


Saturday, April 1, 2017

Winnebago Fuse 23A Power Diagram


Dan Haug at the Travato Collaborative created a series of diagrams on the power systems in the Travato.  The vehicles are close in terms of the way the systems are laid out.   I was able to modify the Travato 59K diagram to show how the power sources in Fuse 23a feed the various systems.

Winnebago Fuse 23a Power Diagram


Thursday, March 30, 2017

Pink Stuff Mod


Editors note:  I am going to post another mod from  Richard Kozloski who has a 2017 Winnebago Fuse and is a member of the Facebook group.  He has modified his Fuse to make winterizing easier.    Please comment in the Facebook Winnebago Owners Group so Richard can respond to everyone directly:

Here are pictures of a mod I made to the pump pickup line to allow pumping anti freeze (pink stuff) for winterizing. Needed on 2017.0 or earlier Fuse. Some early 2017.5 Fuses might also need this mod.

I'm not going to screw the rear floor back down to make it easier to get to the pump for winterizing as it is a snug fit already.

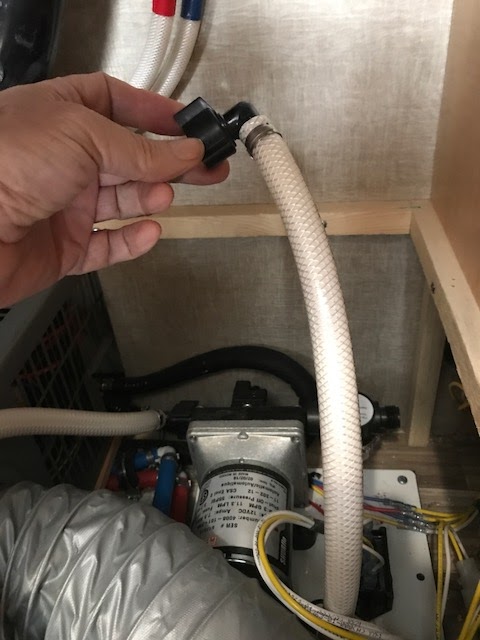
Unmodified line to pickup side of pump.
Winnebago Fuse Winterization Mod


Unmodified view two.
Winnebago Fuse Winterization Mod


Disconnect line from suction side of pump.  You will cut this line and might remove about 3 inches.

Winnebago Fuse Winterization disconnect line

Parts needed:

  • 3 ft of clear tubing
  • fitting and cap for pickup end
  • Three way valve
  • Hose clamps
(Compression fittings off three way valve were not used because of difficulty getting them over the hose.  Would probably make a better seal if you have better luck than I did.)

Winnebago Fuse Winterization Mod parts


Cut the pickup side hose at a location that will allow you to insert the three way valve and still get all the hose under the floor without binding. I removed a short length of hose equal to the length of the three way valve.

Make sure the three way valve allows flow to pump from from either the pickup hose or  tank hose only when selected. If you have pump on wrong side you can't blow through when pickup is selected.  Valve as shown. (When you blow into the pump side of the hose it should only go out the position you have selected.)

Assembled replacement.

Winnebago Fuse Winterization Mod assembled parts


Reconnect the new assembly to the pump and orient the valve to your convenience. Connect the other end to the hose from the tank. Tighten all the clamps and fittings.

In this view the valve is set to pull water from the fresh water tank.

Winnebago Fuse Winterization Mod valve


In this view the valve is positioned to pull anti freeze from the pickup hose placed in the container.

Winnebago Fuse Winterization Mod valve


 I recommend you try pumping water from the tank and the anti freeze line to check for leaks and to make doubly sure you have everything connecter correctly before you button things up.

Just for completeness here is photo of fresh water tank drain. It's function was not changed by this mod.

Winnebago Fuse Winterization Mod drain


Tuesday, March 28, 2017

Lifting the Fuse - The Parts

Editors note:  I am going to post a series of emails from Richard Kozloski who has a 2017 Winnebago Fuse and is a member of the Facebook group.   He has decided to have his Fuse lifted and he is being nice enough to share his experience.  Please comment in the Facebook Winnebago Owners Group so Richard can respond to everyone directly:

Crawling around under the Fuse last week  and found these tags on the parts from my upgrade.
Also rear leaf spring has a big “Ford” painted on it.

They are definitely Ford parts but I can’t say for sure they are Transit.  I haven’t been able to look them up at the local Ford dealer yet.

Ford Transit/Winnebago Fuse Front Spring
On Front Spring

Ford Transit/Winnebago Fuse Rear Leaf Spring
On new extra rear spring leaf

Sunday, March 26, 2017

Omnidirectional Air Conditioning Install

Editors note:  This is a post from the"Travato Owners and Wannabees" Facebook group by Greg Schultz.  The photos are his also.  I believe we have the same Coleman Air Conditioner.  This is reposted with his permission.   -  Please post comments on the Facebook group since Facebook is where it originated.

OMNIDIRECTIONAL AIR CONDITIONING GRILLE INSTALL. Today I received and installed the Coleman Chill Grille assembly with omnidirectional vents. It is definitely a big improvement but you'll have to determine for yourself if it is cost justified. Rather than wait for the ceiling assembly upgrade kit which will be coming out in May, (repair part number 9470-3501, price and content unknown), I went with the available whole ceiling assembly, model 9430D7153. $81.35 from PPL on line. When you look at the pictures you'll see - "whole ceiling assembly" is just that, the whole kit and caboodle. But, forgetaboutit. . all I did today was remove the existing grille cover and replace it with the new one so I've got extra parts for James. Pull off the two control knobs. Remove the two return air filter covers by pulling on the tabs and remove the filters to expose four screws holding the cover in place. Put the new cover in place and secure with the four screws. Replace the filters and covers and control knobs and pour yourself your beverage of choice to celebrate. (NOTE: It does nothing to make the unit more quiet - there are now two more places for the sound of the fan and compressor to enter the coach.) Actual assembly time, less than 15 minutes. Oh, and I can see value in this for both G and K.


Coleman Chill Grille - Greg Schultz

Coleman Chill Grille - Greg Schultz


Coleman Chill Grille - Greg Schultz


Coleman Chill Grille - Greg Schultz


Coleman Chill Grille - Greg Schultz


Coleman Chill Grille - Greg Schultz

Coleman Chill Grille - Greg Schultz


Coleman Chill Grille - Greg Schultz

Coleman Chill Grille - Greg Schultz

Coleman Chill Grille - Greg Schultz